Pages

Showing posts with label style. Show all posts

Wednesday, July 13, 2011

Product Review: Living Proof No Frizz

Over the past few months I have been seeing this new product line appearing everywhere. I'm sure you've seen it around. The frizz logo makes it hard to forget, and it makes you wonder will it really leave my hair with no frizz? Anything I read about this product line said that the formula is completely different than anything else and is called a "revolutionary" product. The newest technology in 30 years to combat frizz called PolyfluoroEster blocks your hair from humidity and locks in the moisture in a way that silicones can't... or so they say. Time to find out.


I have to admit I've actually been using this product for a while now. I have not done the review yet because I was playing with the idea of cutting my hair short. My hair was still slightly damaged from previous colouring and heat styling, and as a result the ends were still slightly straight. I tried to grow it out by trimming it off each time and keeping the new growth healthy to maintain the curl. Unfortunately as it grew longer the straight ends started acting much like split ends. They keep traveling up the hair shaft and won't get better unless completely cut off. So that's what I did. Now that it's cut and healthy here is what my hair looks like not styled, no product air dried.
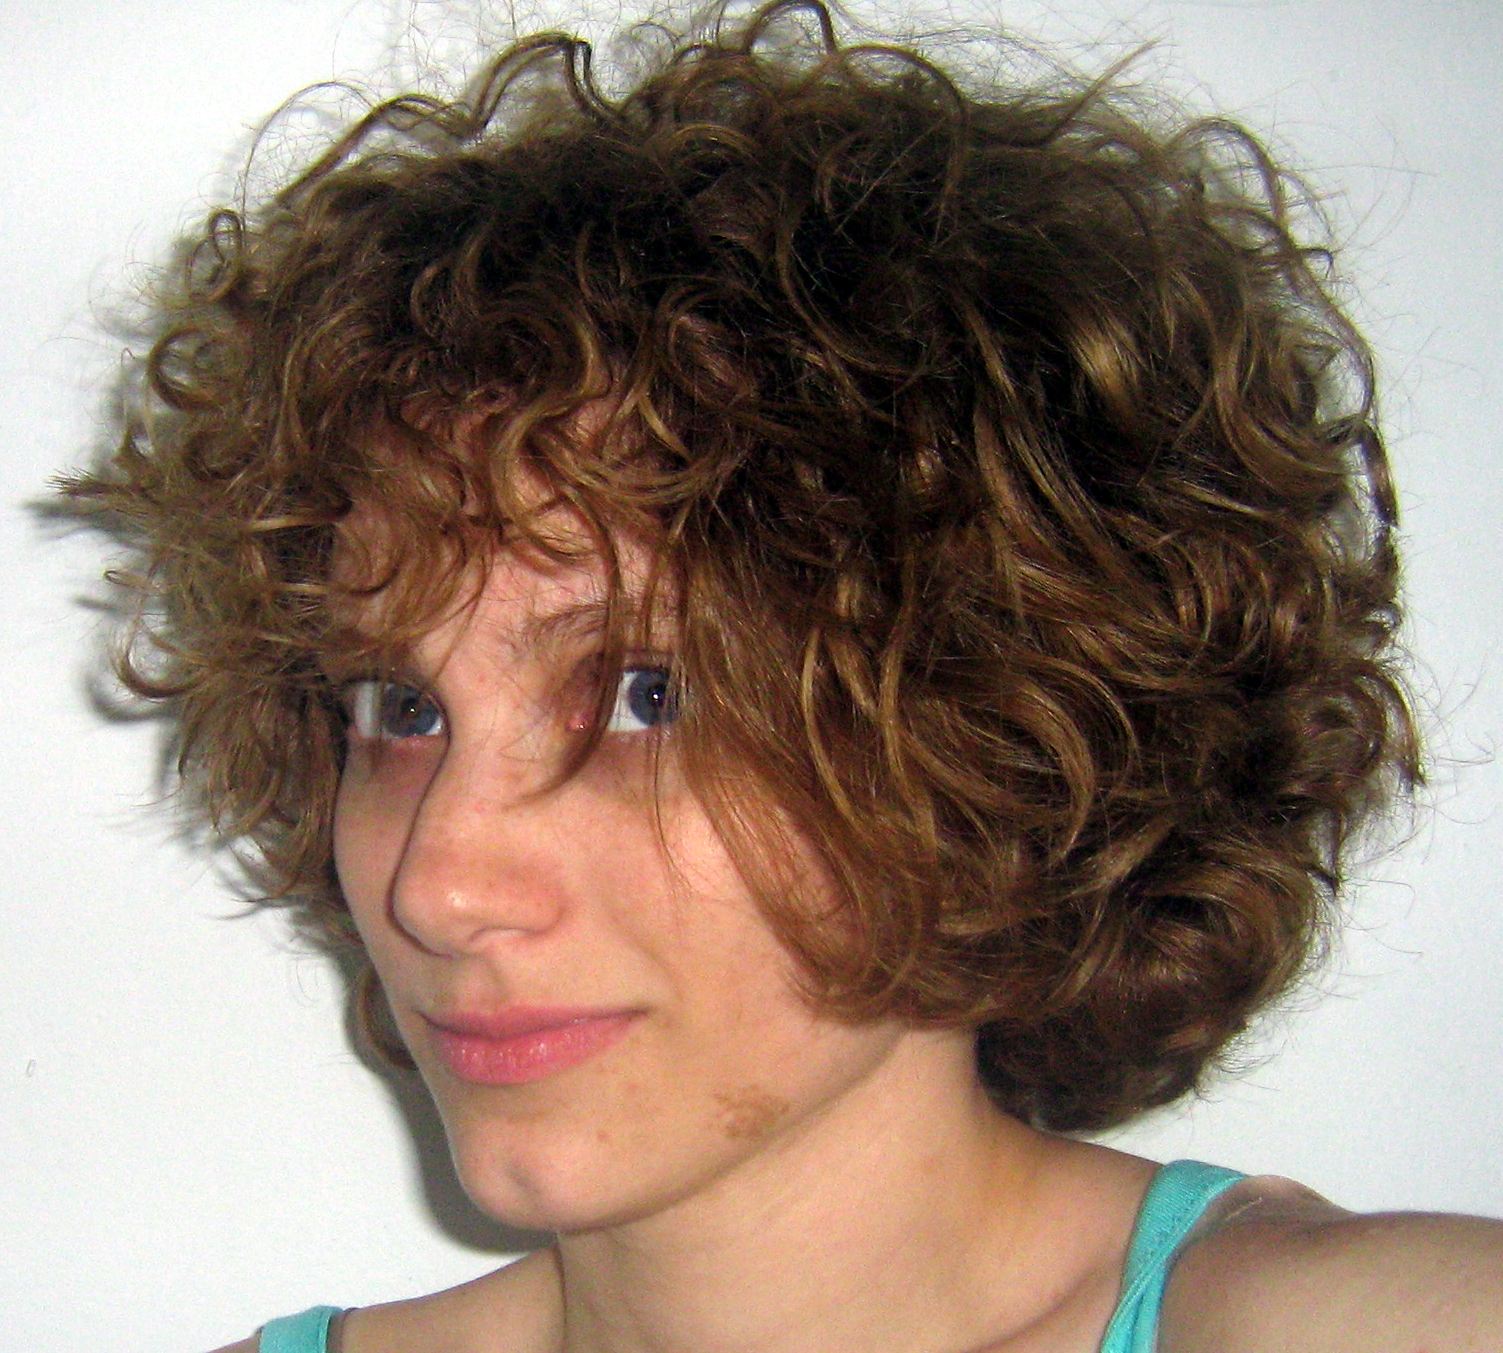

No curl definition, kind of just looks like a fuzzy ball. The picture makes it look nice though, it's a lot frizzier than it looks. This is why I need product. It won't curl unless it has a lot of moisture. Now that it's short I don't need any extra volume so I just dry it with my hand dry gloves (shown above) until most of the moisture is out and air dry the rest. 

To start I shampooed and conditioned with Living Proof's Frizz Shampoo and Conditioner, and followed with the Styling Treatment wave shaping, curl defining for medium to thick hair. There are three styling aids for curly hair, a spray for finer hair, and two creams. One for medium to thick hair and one for thick to coarse hair. 

The Shampoo and Conditioner are sulfate free and all the products I used are paraben free also. A lot of sulfate free shampoos tend to be too gentle, and if you use a lot of product and don't shampoo often (like myself) or if you use silicones in your hair they won't really clean your hair. I've tried some that actually make your hair feel more oily. Living Proof's shampoo was very effective in removing any product build up I had while still not stripping off all of my scalps natural oils. Which is what a good sulfate free shampoo should do. The conditioner did a great job of keeping my hair moisturized. The day I shampoo my hair my curls tend to be very fluffy and frizz up quickly, so I try to shampoo on my day off. This is probably the first shampoo I've used that I would actually shampoo my hair on a day I have to work. They're not super heavy either so if you have finer curly hair you can definitely use it too. 

So here's what my hair looks like after using the Styling Treatment. 


As I mentioned earlier, I used the wave shaping, curl defining for medium to thick hair however I have also used the thick to coarse hair one as well. Because the packaging is the same when I went to my distributor I accidentally picked up the wrong one, so I figured I'd try it out anyways. Both of them actually worked great in my hair, the thick to coarse one made it a little bit crunchy (or if you use too much it will go crunchy).Though once it was completely dry I scrunched it out with my fingers and the crunchiness went away. It completely blocked my hair from the humidity and truly does keep the moisture locked in. I have actually never been more impressed with a curly hair product in my life. Although I'm not really a fan of the smell, it actually really turned me off at first. Someone mentioned that they could smell a bit of a grapefruit scent which totally makes sense because I hate grapefruit. But if it works I don't care what it smells like. 

It is a little more expensive than most salon products. I don't have a problem spending money on products if they're good quality, and these products are definitely worth the price. The shampoo and conditioner are average and should last a long time anyways. The styling cream retails at $26 for a 4oz. bottle, but that's also what you pay for the latest technology, good quality product that works. Let me know what you think of it if you've tried it! 


They also have "Straight" and "Full" as well which I'm very excited to try. I've stopped doing my "Product of the Week" because I'd prefer to focus on doing more in depth reviews of products like this one. As much as I love Living Proof Frizz, I have lots more curly hair products I'm trying out also, so there will be lots more to come. 

Sunday, May 1, 2011

How to Love Your Curls: Part 1

  I know so many people with naturally curly hair who hate their hair. The amount of people who straighten their beautiful curls and wish their hair was naturally straight. I used to be one of them. Most of the time it's just because the curls are just too out of control and doesn't look good when worn curly. Having an improper haircut and not taking proper care of your curls is the main cause of that problem.

  Let me share with you a few pictures of myself when I was in high school, before I had a clue on what to do with my hair, and my story of how I have been able to finally embrace my curl. This guide will be split into two parts, as it is very long & detailed... enjoy :)


  Eventually, I learned to pile on the leave in conditioner and I pulled it half back and that was pretty much it, otherwise it was just too big. I started doing the Japanese straighteners when I was in hair school and wore it straight for two years. After my chemical straighteners grew out, if I decided to wear it curly it would just go frizzy. So I had to continue blow drying & flat ironing it.
In order to go back to wearing it curly I would have to go through a "transition" phase. I'd diffuse it, and the ends would still  be straighter/frizzy so I'd have to curl the ends with a curling iron. I tried that for a little while and then somebody talked me into going blonde and then I had a Keratin Treatment to help repair some damage. Once the treatment washed out I was determined to wear it curly once again.


  The first photo was when I was in hair school doing the Japanese Straightener, second photo is about 4 years ago, the straightener had grown out by then. The third photo is about a year and a half after the second after going blonde and having the Keratin Treatment. As you can see the combination of the colour as well as wearing it straight for that amount of time. I knew that my "transition" phase was going to be a lot of fun. I've still got a bit on the ends to grow out, as you may recall from my Mixed Chicks Review back in January, some of my ends were still straight but overall I'm almost done with my "transition" period, I will share a picture with you of what my hair looks like now in Part 2.


  Let me share with you the four most important steps for maintaining beautiful curls. This is what I have learned from my experience as a hairstylist and working with my own natural curl. 
  1. Cut
  2. Moisture
  3. Handling & Heat Styling
  4. Chemical Processing

1. Cut

  Having a proper haircut is number one because if you don't have the right cut your curls will never look good. Not only is it important to cut it regularly to maintain and control split ends, having a proper cut will actually help your curls to be more defined.

  It's important to have long layers. If your hair is all one length, you will have a lovely case of pyramid head. If the layers are cut too short, then you'll have a mullet. When the layers are too short, they curl up more and then the longer layers will be more weighed down so you will see a distinctive "separation" of the layers.
  That's why it is important to have your hair cut by somebody who is comfortable and experienced with working with curly hair.
  I rarely "texturize" or "thin" my curly haired clients. Why? Because by doing that you will create a whole bunch of shorter hairs and because those hairs are shorter than the length they won't really "know" where to go and they'll frizz out. That is one of the main causes of flyaways. The ends need to be full and that way all the hairs will curl together. For visual learners, let me show you an example:

  The left is a hair strand that is not thinned out, it is nice and full so all the hairs curl together nicely. The right is a strand that is overly thinned out. As you can see there are shorter hairs and they stick out in random places, and the ends are much thinner which also makes them appear frizzier. That's not to say that thinning and texturizing is always bad, however it must be done by somebody who really knows what they are doing. This is also the same reason why having your hair cut with a razor is generally not a good idea if you have curly hair, and this is why it is important to cut your hair on a regular basis. Because curly hair is naturally dry it tends to get split ends easier, and your hair doesn't grow evenly all over the head so some strands grow slower, some faster. It's important to trim off the stray hairs to keep shape and to avoid frizz on the ends. 

2. Moisture... Moisture... MOISTURE!!!

  Naturally curly hair is also naturally dry, so it is crucial to keep it properly moisturized. Shampoo dries out the hair and scalp. Period. I don't care what shampoo you are using, "organic" or "natural" or "sulfate free" or how expensive it may be, it is still drying on your hair. So less is often more. I shampoo my hair once a week, if your hair is fine and/or thin you may need to shampoo more often, but no more than two to three times a week.

  I condition my hair every day. Why? Well first, I do have to wet it every day (if you saw it in the morning you'd understand). There are some product re-activating sprays available which are awesome, but unfortunately those are not enough for my hair. Even wetting your hair slightly dries it out so anytime I wet my hair, I also condition. The conditioner keeps it from drying out from the water and also gives your hair something to "drink" so you won't use as much leave-in and it will last longer.

 After conditioning I'll use my leave-in, and I use a lot. You have to put your leave-in while your hair is still wet. Not drippping, but still wet, otherwise once it's begin to frizz you're too late. Your hair has to be evenly coated, tip your hair upside down and start applying at the ends and work your way up. The ends always need more moisture so it's important to start there. I apply enough that I can hear it making a squishing sound when I scrunch it. Some products will make my hair crunchy and sone will not. I tend to have better luck with cremes, however  different curly hair types will react differently. Some products however are designed to go crunchy at first and then you need to "scrunch the crunch" to make it soft.
   Generally fine, thin hair types & looser curls may benefit from a mousse and thick, coarse and/or curlier hair types will benefit more from something heavier like an oil or a creme or even some types of gels. I like to use cremes, and then an oil afterwards to seal the ends and keep in the moisture. Oils also tend to have silicones in them as well, so be careful not to overuse them or they can build up. Your curl pattern and what kind of a result you want with your curls will determine what products to use. Experiment with different products, see what you like with different products.

  You may allow your hair to air dry, or diffuse dry after applying your chosen product. I can not stress enough how important a proper cut and keeping your hair moisturized is. If you can do those two things you are well on your way to enjoying your curls. Be sure to check back soon in Part 2 I will discuss proper handling techniques, heat styling, chemical processing & how it will affect your curl.


Sunday, September 26, 2010

Photo Shoot!

I did a photo shoot recently, and here are some of the pictures from it. Makeup was done by Lydia Parris and Christine Spence, photography was done by Stacy Hylton.

This model has naturally curly hair that is slightly texturized, which in chemical terms is a very mild relaxer that is not left on for very long. Just enough to break down the curl just slightly so you can still wear it curly, but it makes it much easier to blowdry & style on your own.
For this look, I blowdried her hair straight with a paddle brush. The best way to blowdry afro-textures is to start at the ends and then work your way to the root. The paddle brush also enables you to efficiently get to the root, so you can get it straight. After blowdrying, I went through with the flat iron to smooth it out & add some loose curls to her ends.


I did this model's colour as well as style. She has naturally straight fine hair, so I used lots of mousse and blowdried her hair wavy with a roundbrush, leaving them in to cool down. After it was dry I went through the ends of her hair with the flat iron to add a bit more definition.